Modifying the Fiat Abarth 750 GT Derivizione
Coupe Zagato
Abarth cars are still being made today and are a marvel of automotive technology. By today's standards, the technology that went into the old cars is antique. State of the art then, but outdated today. Parts are difficult to find, especially if one tries to keep the car totally "original". Truth is, a totally "original" car is a handful to drive quickly, and an even bigger problem to stop!
The racing versions were somewhat modified and especially well prepared. In keeping with that tradition, I chose to blend the best of the old and the new when putting this one back together. In the spirit of keeping the car both as original as possible while improving its performance and reliability, here are some of the modifications that were made during Her Majesty's restoration. It's what Karl Abarth would have done!
I hope this can be of some help if you're rebuilding an Abarth. Feel free to email if you have questions.
Jim Romano
| Sub-system | Specifics | Comments |
|---|---|---|
| Engine: | OT1000 displacement 1098cc | modified |
| Brakes: | OT1000 (Fiat 850 based) disks front; Fiat 124 disks rear with emergency brakes | |
| Transaxle: | Hewland Mark 4 4-speed, quick change gears | In top gear, with present gearsets installed, 70 mph arrives at 4000 RPM |
| Double CV joint axles: | Custom assembly:VW cv joints inboard, Suzuki Swift CV joints outboard. | In my humble opinion, the double CV joint axles used to connect the Hewland to the Fiat hubs are works of art. |
| Front suspension: | OT1000 uprights, connected to the Original Abarth transverse leaf spring | |
| Rear suspension: | original | |
| Wheels: | OT1000 front and rear | 13” deep offset pressed steel |
| Tires: | Yokohama A008 175/50/R13 | They are simply Amazing !!!! |
Disk Brake Modification
Disk brakes, both front and rear are relatively simple to fit to these machines. Originality aside, this conversion is a HUGE safety factor.
I kept the 600 master cylinder (although an 850 would work as well,) and replaced the stock front uprights with Fiat 850 units, complete with calipers, rotors and tie rod ends. Fittings are all compatible. A front end alignment is, of course, in order.
For the REAR, I chose to use Fiat 124 spider rear rotors and calipers. You will need to fabricate a caliper carrier plate for each side. This plate simply replaces the existing rear brake carrier plate. The 124 calipers also offer the benefit of parking brakes at the rear wheels. Again the fittings are all compatible. Blueprints for the plate are included here as well as an assembly drawing.
The downside is that the stock 12" wheels will not clear the calipers either front or rear. 13" wheels from other Fiats will, however fit. I used the deep offset wheels from an Abarth OT1000. LUV EM! The upside is — the conversion is quick and painless, and the results are SPECTACULAR! The two pictures below show you the specifics for the rear wheels.
NOTE: (June 2011) I recently learned of a front disk brake conversion that will allow the use of the original Abarth 12" diameter wheels. It's pricy at close to $1000 but supposedly it does work. So far I know of nothing similar for the rear wheels. Available from MrFiat.com (Fiatinc on EBAY). They are a respectable outfit, but for the record, I'm still quite annoyed with them for deliberately stealing the "MrFiat" name that has been my EBAY (and other online venues) name since 1996. Not a very cool thing to do.

Rear Carrier Plate Blueprint

Assembly Drawing
OK, so this car isn’t factory original. However, I have made an educated effort to keep the car true to the spirit of the Abarth name. In other words, given the functionality that I wanted and the parts available, I’ve tried to modify the car is a way that I believe the Abarth factory would have done if they had kept producing the vehicle. A personal opinion, of course, but I firmly believe Karl would have approved.
Dashboard & instrumentation
Gauges
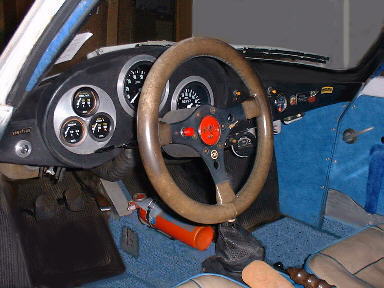
As the engine was a transplant from my terminally rusted Abarth OT1000, the instruments were also salvaged and used. These instruments are pretty much the same ones used on the Fiat 850. They’re smaller than the Jaegers used on the 750 Zagato,, so they wouldn’t fit directly into the existing dashboard holes. Also the 750 uses a cluster gauges setup for the temp/fuel/pressure. The 850/1000OT uses individual gauges. The solution was to build aluminum adapters that would fit into the existing holes and in turn carry the smaller gauges. As it worked out, the 3 gauges for fuel, temp, & pressure were able to cluster nicely into the available opening.
Dashboard switches
The dashboard switches are still original and need to be cleaned and deoxidized periodically. The headlamp switch is especially quirky when it starts to get dirty.
Steering Wheel
The steering wheel is fat little Racemark unit measuring a scant 12 inches (304 mm) in diameter. It used to be black! The center horn cap is a plastic Abarth scorpion hub cap insert which happens to fit perfectly. This gave me a good incentive to add a perfectly wonderful red push button to one of the spokes for a horn. It's very convenient and I think it looks pretty good there!

Instrument Panel Gauges & Steering Wheel
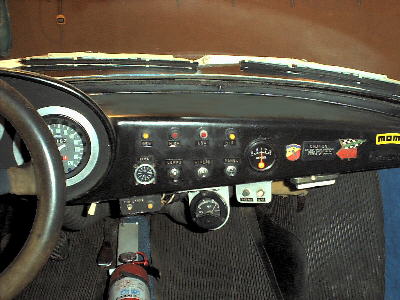
Key switch, clock, washer pump actuator
What else??? Oh yes, the key switch was moved from the right of the steering wheel to the left and in the hole it left behind, now resides a very neat 24 hour Bulova Accutron clock. Identical to the timepiece used on the NASA Apollo Moon Missions. What can I say? Perhaps I just have too much time on my hands! (pun intended!)As is the case with most of these cars, the rubber manual washer pump dried out an cracked, so an electric washer pump was fitted. The actuator button resides in the same spot as the old mechanical pump, and the plastic washer bag that came with the car is still being used!
Everything else (except the ashtray)
Except for a voltmeter, ammeter and the controls for the halogen driving lamps, everything else on the dashboard is original. The ammeter lives in the hole vacated by the ash tray.
ASH TRAY??? My car did come with one and sorry, it was downright ugly! : )

Abarth dashboard modified to hold clock, ammeter, and voltmeter
Seats
One winter project was rebuilding the seats. The foam rubber was dried and brittle and crumbling all over the floor. As this is a common problem, I have posted the particulars of rebuilding the Abarth Zagato 750 GT seats with Kemmler gel padding (the same stuff used by a couple of Formula 1 and Nascar teams). I'm happy to say that the results look pretty good, and the seats are wonderfully comfortable.
Quick Change Transaxle
It is said that a picture is worth a thousand words. So photographs and a writeup of the Hewland / Abarth interface are now posted. There's lots to talk about — things like adapter plates, mounting brackets, release bearing choices, axles, and the nasty, evil "shift linkage". ; )
